// Copyright 2018 Sticks & Stones. All Rights Reserved.
#include "BuildingPlacementComponent.h"
#include "BuildingNode.h"
#include "BuildingEnum.h"
#include "Gameplay/Player/SurvivalGamePlayerController.h"
#include "Gameplay/Placeable/BasePlaceable.h"
#include "Gameplay/PowerCore/PowerCore.h"
#include "Gameplay/Player/InventoryComponent.h"
#include "Gameplay/Sound/ReplicatedSoundComponent.h"
#include "Gameplay/Player/PlayerCharacter.h"
#include "UI/BuildingWidget.h"
#include "Blueprint/UserWidget.h"
#include "Engine/GameEngine.h"
#include "Engine/Public/EngineUtils.h"
#include "Engine/Classes/Components/StaticMeshComponent.h"
#include "Engine/Classes/Materials/MaterialInstanceDynamic.h"
#include "Engine/Classes/Sound/SoundCue.h"
#include "Runtime/Engine/Public/TimerManager.h"
#include "Runtime/Engine/Classes/Kismet/GameplayStatics.h"
#include "Runtime/UMG/Public/Blueprint/WidgetBlueprintLibrary.h"
#include "Runtime/CoreUObject/Public/UObject/Class.h"
#include "Net/UnrealNetwork.h"
UBuildingPlacementComponent::UBuildingPlacementComponent()
{
PrimaryComponentTick.bCanEverTick = true;
CurrentSelected = EBuildingType::BUILDING_SQUARE_FOUNDATION;
TotalMineCount = 0;
TotalSpikeTrapCount = 0;
TotalElectricTrapCount = 0;
TotalTurretCount = 0;
TotalLaserCannonCount = 0;
}
FBuildingMeshData UBuildingPlacementComponent::GetPreviewPlaceableData()
{
return PreviewPlaceable;
}
void UBuildingPlacementComponent::BeginPlay()
{
Super::BeginPlay();
PlayerCharacter = Cast<APlayerCharacter>(GetOwner());
if (PlayerCharacter == nullptr)
{
GEngine->AddOnScreenDebugMessage(-1, 10.0f, FColor::Yellow, FString::Printf(TEXT("UBuildingPlacementComponent is not owned by a character")));
}
ReplicatedSoundComponent = Cast<UReplicatedSoundComponent>(PlayerCharacter->GetComponentByClass(UReplicatedSoundComponent::StaticClass()));
LocallyControlled = PlayerCharacter->IsLocallyControlled();
NewBuildingPreviewNode = GetWorld()->SpawnActor<ABuildingNode>();
NewBuildingPreviewNode->SetActorScale3D(FVector(1.0f, 1.0f, 1.0f));
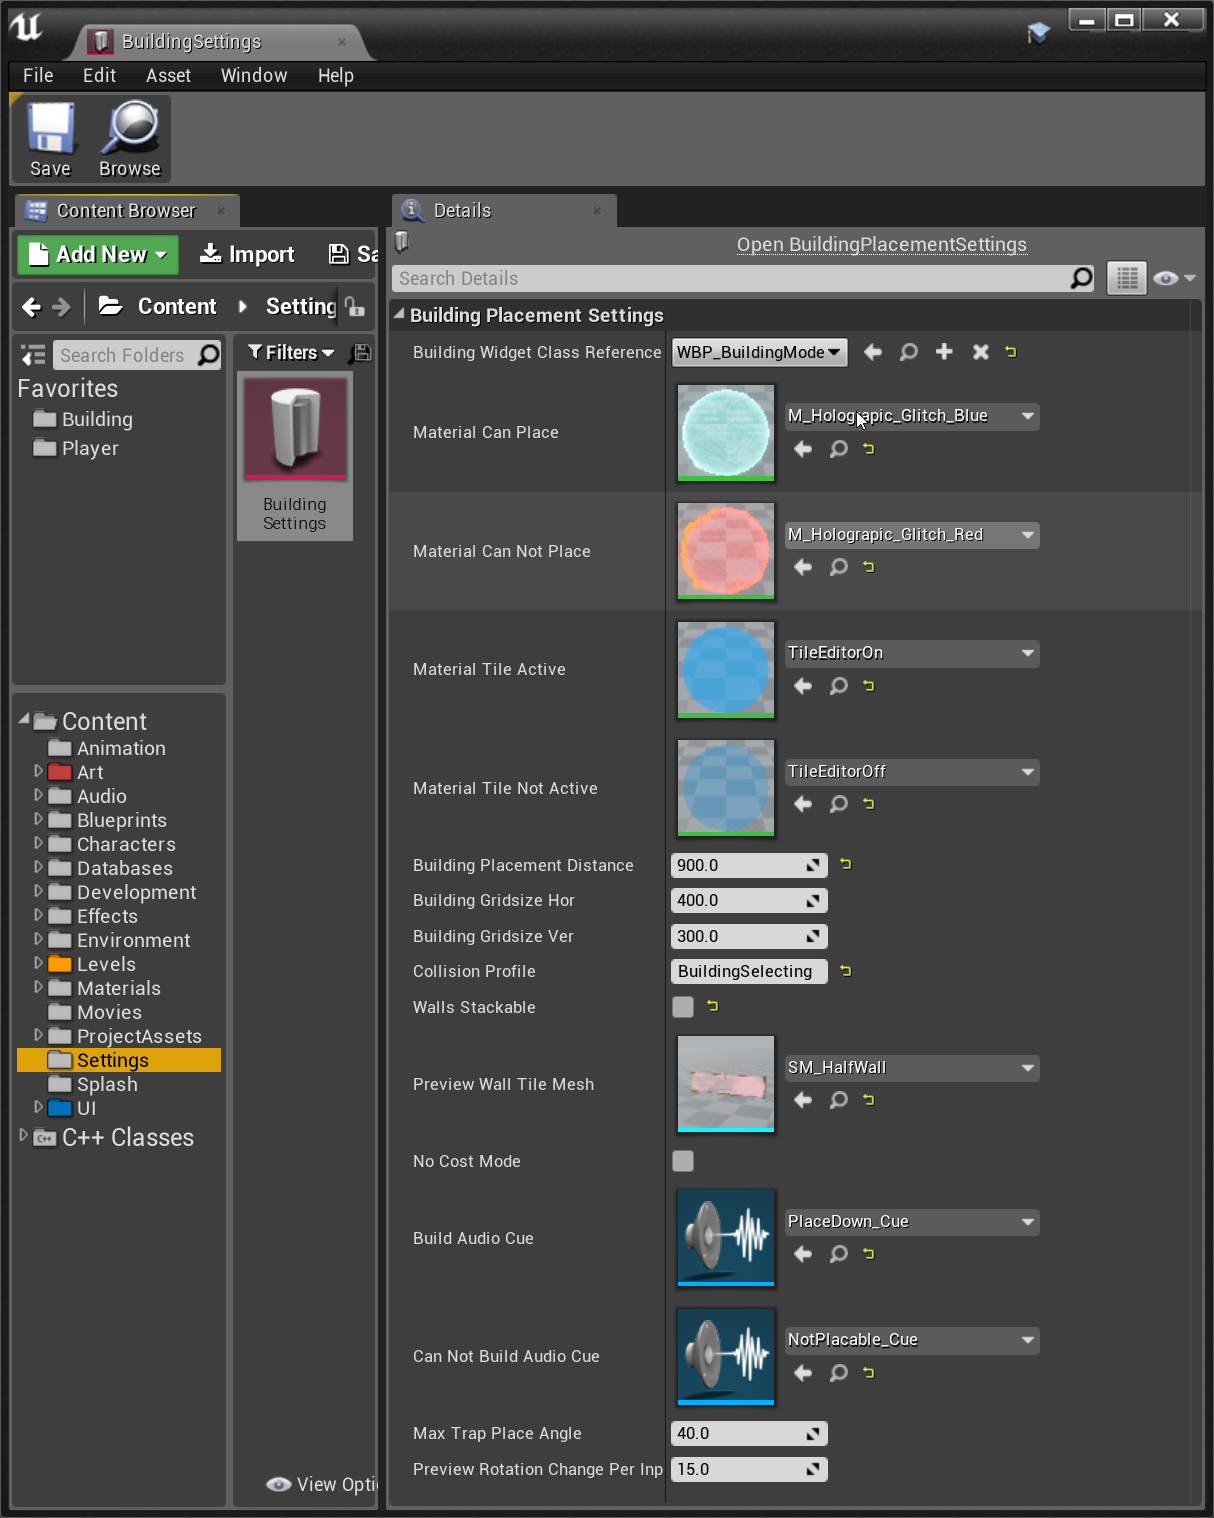
NewBuildingPreviewNode->SetBuildingSettings(BuildingSettings, CurrentSelected, true);
PreviewStaticMeshComp = Cast<UStaticMeshComponent>(NewBuildingPreviewNode->GetComponentByClass(UStaticMeshComponent::StaticClass()));
if (!LocallyControlled)
{
return;
}
if (BuildingSettings == nullptr)
{
GEngine->AddOnScreenDebugMessage(-1, 10.0f, FColor::Yellow, FString::Printf(TEXT("Set BuildingPlacmentSettings in the building placement component")));
return;
}
InitBuildingUI();
}
ABuildingNode* UBuildingPlacementComponent::GetPreviewMesh()
{
if (NewBuildingPreviewNode)
{
return NewBuildingPreviewNode;
}
return nullptr;
}
void UBuildingPlacementComponent::SetPreviewPlaceable(FBuildingMeshData arg_NewPreviewPlaceable)
{
PreviewPlaceable = arg_NewPreviewPlaceable;
bPreviewPlacableSet = true;
OnBuildingTypeSelectedChange(PreviewPlaceable.BuildingType);
}
void UBuildingPlacementComponent::GetLifetimeReplicatedProps(TArray<FLifetimeProperty>& OutLifetimeProps) const
{
Super::GetLifetimeReplicatedProps(OutLifetimeProps);
DOREPLIFETIME(UBuildingPlacementComponent, PreviewPlaceable);
DOREPLIFETIME(UBuildingPlacementComponent, BuildingSettings);
}
void UBuildingPlacementComponent::TurnBuildUIOn()
{
if (PlayerCharacter)
{
PlayerCharacter->EventOnOpenBuildMenu();
bBuildingUION = true;
bBuildingModeOn = true;
NotifyPlaceablesOnBuildModeToggle(true);
if (BuildingWidget)
{
BuildingWidget->AddToViewport(3);
}
UpdatePreviewMesh(nullptr);
bPreviewPlacableSet = false;
APlayerController *playerController = Cast<APlayerController>(PlayerCharacter->GetController());
if (playerController != nullptr)
{
playerController->bShowMouseCursor = true;
FInputModeGameAndUI InputMode;
InputMode.SetHideCursorDuringCapture(false);
InputMode.SetLockMouseToViewportBehavior(EMouseLockMode::DoNotLock);
playerController->SetInputMode(InputMode);
}
}
}
void UBuildingPlacementComponent::TurnBuildUIOff()
{
if (bBuildingUION)
{
bBuildingUION = false;
if (PlayerCharacter)
{
PlayerCharacter->EventOnCloseBuildMenu();
if (BuildingWidget != nullptr)
{
BuildingWidget->RemoveFromViewport();
APlayerController *playerController = Cast<APlayerController>(PlayerCharacter->GetController());
if (playerController != nullptr)
{
playerController->bShowMouseCursor = false;
UWidgetBlueprintLibrary::SetInputMode_GameOnly(playerController);
}
}
}
}
}
bool UBuildingPlacementComponent::GetIsBuildingModeOn()
{
return bBuildingModeOn;
}
void UBuildingPlacementComponent::TickComponent(float arg_DeltaTime, ELevelTick arg_TickType, FActorComponentTickFunction* arg_ThisTickFunction)
{
Super::TickComponent(arg_DeltaTime, arg_TickType, arg_ThisTickFunction);
if (!bBuildingModeOn || !LocallyControlled)
{
return;
}
const FVector PlayerForward = PlayerCharacter->GetControlRotation().Vector();
const FVector CameraLocation = GEngine->GetFirstLocalPlayerController(GetWorld())->PlayerCameraManager->GetCameraLocation();
// Line trace to get possible placement position
const FVector LineOrigin = CameraLocation;
const float LineTraceDistance = 1000.0f;
const FVector LineEnd = LineOrigin + (PlayerForward * LineTraceDistance);
const auto Channel = ECC_CanPlacePlaceableOn;
const auto BuildingTraceChannel = ECC_Building;
FHitResult HitResultWorld;
TArray<FHitResult> BuildingHitResults;
const auto Params = FCollisionQueryParams(TEXT("Trace"), false, GetOwner());
const bool bHit = GetWorld()->LineTraceSingleByChannel(HitResultWorld, LineOrigin, LineEnd, Channel, Params);
bool bHitBuilding = GetWorld()->LineTraceMultiByChannel(BuildingHitResults, LineOrigin, LineEnd, BuildingTraceChannel, Params);
//bHitBuilding = false;
// check other nodes near
if (bHitBuilding)
{
float Closest = TNumericLimits<float>::Max();
int ClosestIndex = 0;
for (int i = 0; i < BuildingHitResults.Num(); i++)
{
float HitDist = FVector::Dist(BuildingHitResults[0].ImpactPoint, BuildingHitResults[i].GetActor()->GetActorLocation());
if (HitDist < Closest)
{
Closest = HitDist;
ClosestIndex = i;
}
}
UPrimitiveComponent* HitComponentBuilding = BuildingHitResults[ClosestIndex].GetComponent();
if (HitComponentBuilding != nullptr)
{
ABuildingNode* HitNode = Cast<ABuildingNode>(BuildingHitResults[ClosestIndex].GetActor());
if (bPrintHitOnScreenDebugMessage)
{
GEngine->AddOnScreenDebugMessage(-1, 1.0f, FColor::Cyan, FString::Printf(TEXT("[UBuildingPlacementComponent] hit building: ")) + HitComponentBuilding->GetName());
}
if (HitNode != nullptr)
{
UpdatePreview(BuildingHitResults[ClosestIndex], LineOrigin, PlayerForward, HitNode);
return;
}
}
}
if (bHit) // if something is hit that is not a building node
{
UPrimitiveComponent* HitComponent = HitResultWorld.GetComponent();
if (HitComponent != nullptr)
{
if (bPrintHitOnScreenDebugMessage)
{
GEngine->AddOnScreenDebugMessage(-1, 1.0f, FColor::Blue, FString::Printf(TEXT("[UBuildingPlacementComponent] hit: ")) + HitComponent->GetName());
}
}
else
{
GEngine->AddOnScreenDebugMessage(-1, 1.0f, FColor::Red, FString::Printf(TEXT("[UBuildingPlacementComponent] HitComponent = null ")));
}
UpdatePreview(HitResultWorld, LineOrigin, PlayerForward);
}
else // if nothing is hit
{
UpdatePreviewCanNotPlace(LineOrigin, PlayerForward);
}
}
void UBuildingPlacementComponent::BuildTogglePressed()
{
if (bBuildToggleModeEnabled)
{
if (bBuildingUION)
{
TurnBuildUIOff();
if (PreviewStaticMeshComp->GetStaticMesh() != nullptr)
{
if (PlayerCharacter)
{
PlayerCharacter->GetWeaponComponent()->TurnOff();
}
}
else
{
TurnOffBuildingMode();
}
}
else
{
TurnBuildUIOn();
if (PlayerCharacter)
{
PlayerCharacter->GetWeaponComponent()->TurnOff();
}
}
}
else
{
TurnBuildUIOn();
if (PlayerCharacter)
{
PlayerCharacter->GetWeaponComponent()->TurnOff();
}
}
}
void UBuildingPlacementComponent::BuildToggleRelease()
{
if (!bBuildToggleModeEnabled)
{
TurnBuildUIOff();
if (PreviewStaticMeshComp->GetStaticMesh() == nullptr)
{
TurnOffBuildingMode();
}
}
if (PlayerCharacter)
{
PlayerCharacter->GetWeaponComponent()->TurnOn();
}
}
void UBuildingPlacementComponent::BuildModeClickDisable()
{
TurnBuildUIOff();
TurnOffBuildingMode();
UpdatePreviewMesh(nullptr);
bPreviewPlacableSet = false;
/*if (PlayerCharacter)
{
UWeaponComponent* WeaponComponent = PlayerCharacter->GetWeaponComponent();
if (WeaponComponent)
{
WeaponComponent->TurnOff();
}
else
{
UE_LOG(LogTemp, Warning, TEXT("Weapon component on the player not found!"));
}
}*/
}
void UBuildingPlacementComponent::NotifyPlaceablesOnBuildModeToggle(bool arg_IsBuildModeEnabled)
{
for (TActorIterator<ABasePlaceable> ItPlaceable(GetWorld()); ItPlaceable; ++ItPlaceable)
{
if (ItPlaceable->IsValidLowLevelFast())
{
if (arg_IsBuildModeEnabled)
{
ItPlaceable->OnBuildingModeEnabled();
}
else
{
ItPlaceable->OnBuildingModeDisabled();
}
}
}
}
void UBuildingPlacementComponent::RotatePreview(float arg_rotationChange)
{
if (!bPreviewPlacableSet)
{
return;
}
if (bBuildingModeOn)
{
PreviewRotation += BuildingSettings->PreviewRotationChangePerInput * arg_rotationChange;
}
}
void UBuildingPlacementComponent::RotatePreviewReset()
{
if (!bPreviewPlacableSet)
{
return;
}
if (bBuildingModeOn)
{
PreviewRotation = 0.0f;
}
}
void UBuildingPlacementComponent::UpdatePreview(const FHitResult &arg_HitResult, const FVector &arg_LineOrigin, const FVector &arg_Forward, ABuildingNode *arg_HitBuildingNode)
{
const bool bIsInRange = FVector::Distance(arg_HitResult.ImpactPoint, arg_LineOrigin) < BuildingSettings->BuildingPlacementDistance;
const bool bIsFoundationOrPlaceable =
NewBuildingPreviewNode->GetBuildingType() == EBuildingType::BUILDING_SQUARE_FOUNDATION
|| NewBuildingPreviewNode->GetBuildingType() == EBuildingType::BUILDING_TRIANGLE_FOUNDATION
|| NewBuildingPreviewNode->GetBuildingType() == EBuildingType::BUILDING_PLACEABLE;
const bool bHasHitBuilding = arg_HitBuildingNode != nullptr;
FVector_NetQuantizeNormal HitNormal = arg_HitResult.ImpactNormal;
float TerrainDot = FVector::DotProduct(HitNormal, FVector(0.0f, 0.0f, 1.0f));
bool bCanPlaceAtGroundAngle = 1.0f - ((TerrainDot + 1.0f) / 2.0f) < (BuildingSettings->MaxTrapPlaceAngle / 360.0f);
if (bIsInRange && bHasHitBuilding) // if hit building node and is in range
{
BuildingSocket* ClosestSocketOfHitBuilding = arg_HitBuildingNode->GetClosestSocketToPoint(arg_HitResult.ImpactPoint, CurrentSelected);
FVector LocalNodeOffset = ClosestSocketOfHitBuilding->LocalPosition;
FVector SockWorldSpacePositionLocalSpaceRotation = arg_HitResult.GetActor()->GetActorRotation().RotateVector(LocalNodeOffset);
NewBuildingPreviewNode->SetActorRotation(arg_HitBuildingNode->GetActorRotation());
NewBuildingPreviewNode->SetActorLocation(SockWorldSpacePositionLocalSpaceRotation + arg_HitResult.GetActor()->GetActorLocation());
BuildingSocket *PreviewSocket = NewBuildingPreviewNode->GetClosestSocketToPoint(arg_HitBuildingNode->GetActorLocation(), arg_HitBuildingNode->GetBuildingType());
if (PreviewSocket != nullptr)
{
FRotator NewRotation = arg_HitBuildingNode->GetActorRotation();
FVector previewDir = NewRotation.RotateVector(PreviewSocket->SocketDirection);
FVector hitSocketDir = NewRotation.RotateVector(ClosestSocketOfHitBuilding->SocketDirection);
float previewAngle = FMath::RadiansToDegrees(FMath::Atan2(previewDir.X, previewDir.Y));
float hitSocketAngle = FMath::RadiansToDegrees(FMath::Atan2(hitSocketDir.X, hitSocketDir.Y));
float angleDelta = previewAngle - hitSocketAngle + 180.0f;
NewRotation.Add(0.0f, angleDelta, 0.0f); // preview sockets rotation
NewBuildingPreviewNode->SetActorRotation(NewRotation);
NewBuildingPreviewNode->SetActorLocation(NewBuildingPreviewNode->GetActorLocation() - NewBuildingPreviewNode->GetActorRotation().RotateVector(PreviewSocket->LocalPosition));
}
bCanSpawn = true;
}
else if (bIsInRange && bIsFoundationOrPlaceable) // if can place on ground and is a foundation or placeable
{
// set rotation and location of preview
FRotator PlaceableZRotation = FRotator(0.0f, PreviewRotation + FMath::RadiansToDegrees(FMath::Atan2(arg_Forward.Y, arg_Forward.X)), 0.0f);
float AngleXZ = FMath::RadiansToDegrees(FMath::Atan2(HitNormal.X, HitNormal.Z));
float AngleYZ = FMath::RadiansToDegrees(FMath::Atan2(HitNormal.Y, HitNormal.Z));
PlaceableZRotation = (FQuat::MakeFromEuler(FVector(AngleYZ, -AngleXZ, 0.0f))* PlaceableZRotation.Quaternion() * PreviewPlaceable.PreviewRotation.Quaternion()).Rotator();
NewBuildingPreviewNode->SetActorRotation(PlaceableZRotation);
NewBuildingPreviewNode->SetActorLocation(arg_HitResult.ImpactPoint);
// overlap check
ABasePlaceable *PlaceableDefaultObject = Cast<ABasePlaceable>(PreviewPlaceable.Placeable.GetDefaultObject());
bool bAreaFilled = true;
if (PlaceableDefaultObject != nullptr)
{
float shpereRadius = PlaceableDefaultObject->GetSphereOverlapTestRadius();
FVector BoxOverlapTestSize = PlaceableDefaultObject->GetBoxOverlapTestSize();
bAreaFilled = GetWorld()->OverlapBlockingTestByChannel(arg_HitResult.ImpactPoint, PlaceableZRotation.Quaternion(), ECC_Building, FCollisionShape::MakeSphere(shpereRadius))
|| GetWorld()->OverlapBlockingTestByChannel(arg_HitResult.ImpactPoint, PlaceableZRotation.Quaternion(), ECC_Building, FCollisionShape::MakeBox(.5f*BoxOverlapTestSize));
}
// can buy check
bool bCanBuy = true;
if (PlayerCharacter->InventoryComponent->GetResource(PreviewPlaceable.PlacementCost.ItemType) < PreviewPlaceable.PlacementCost.ItemAmount)
{
bCanBuy = false;
}
bCanSpawn = bCanPlaceAtGroundAngle && !bAreaFilled && bCanBuy;
}
else
{
UpdatePreviewCanNotPlace(arg_LineOrigin, arg_Forward);
}
UpdatePreviewPosAndRot(NewBuildingPreviewNode->GetActorLocation(), NewBuildingPreviewNode->GetActorRotation(), bCanSpawn);
}
void UBuildingPlacementComponent::UpdatePreviewCanNotPlace(const FVector &arg_LineOrigin, const FVector &arg_Forward)
{
FVector Forward = arg_Forward;
Forward.Normalize();
Forward *= BuildingSettings->BuildingPlacementDistance;
NewBuildingPreviewNode->SetActorLocation(Forward + arg_LineOrigin);
NewBuildingPreviewNode->SetActorRotation(FRotator(0.0f, PreviewRotation + FMath::RadiansToDegrees(FMath::Atan2(Forward.Y, Forward.X)), 0.0f).Quaternion() * PreviewPlaceable.PreviewRotation.Quaternion());
bCanSpawn = false;
UpdatePreviewPosAndRot(NewBuildingPreviewNode->GetActorLocation(), NewBuildingPreviewNode->GetActorRotation(), false);
}
void UBuildingPlacementComponent::UpdatePreviewPosAndRot(FVector arg_NewPosition, FRotator arg_NewRotation, bool arg_CanPlace)
{
if (!LocallyControlled)
{
return;
}
UpdatePreviewMaterial(bCanSpawn);
NewBuildingPreviewNode->SetActorLocation(arg_NewPosition);
NewBuildingPreviewNode->SetActorRotation(arg_NewRotation);
PreviewStaticMeshComp->SetWorldRotation(arg_NewRotation);
PreviewStaticMeshComp->SetWorldLocation(arg_NewPosition + arg_NewRotation.RotateVector(PreviewPlaceable.Offset));
ServerUpdatePreview(PreviewStaticMeshComp->GetComponentLocation(), NewBuildingPreviewNode->GetActorLocation(), NewBuildingPreviewNode->GetActorRotation(), arg_CanPlace);
}
void UBuildingPlacementComponent::PlacePowerCore_Implementation(FVector arg_Location, FRotator arg_Rotation)
{
TArray<AActor*> FoundPowerCores;
UGameplayStatics::GetAllActorsOfClass(GetWorld(), APowerCore::StaticClass(), FoundPowerCores);
for (auto Core : FoundPowerCores)
{
Core->SetActorLocation(arg_Location);
Core->SetActorRotation(arg_Rotation);
Cast<APowerCore>(Core)->PlacePowerCore();
TurnOffBuildingMode();
APlayerCharacter* Player = Cast<APlayerCharacter>(GetOwner());
if (Player)
{
Player->GetWeaponComponent()->TurnOn();
Player->GetInventoryComponent()->DropPowerCore();
}
}
}
bool UBuildingPlacementComponent::PlacePowerCore_Validate(FVector arg_Location, FRotator arg_Rotation)
{
return true;
}
void UBuildingPlacementComponent::ServerUpdatePreview_Implementation(FVector arg_MeshLocation, FVector arg_ActorLocation, FRotator arg_ActorRotation, bool arg_CanPlace)
{
MulticastUpdatePreview(arg_MeshLocation, arg_ActorLocation, arg_ActorRotation, arg_CanPlace);
}
bool UBuildingPlacementComponent::ServerUpdatePreview_Validate(FVector arg_MeshLocation, FVector arg_ActorLocation, FRotator arg_ActorRotation, bool arg_CanPlace)
{
return true;
}
void UBuildingPlacementComponent::MulticastUpdatePreview_Implementation(FVector arg_MeshLocation, FVector arg_ActorLocation, FRotator arg_ActorRotation, bool arg_CanPlace)
{
if (!LocallyControlled)
{
PreviewStaticMeshComp->SetWorldLocation(arg_MeshLocation);
PreviewStaticMeshComp->SetWorldRotation(arg_ActorRotation);
NewBuildingPreviewNode->SetActorLocation(arg_ActorLocation);
NewBuildingPreviewNode->SetActorRotation(arg_ActorRotation);
UpdatePreviewMaterial(arg_CanPlace);
}
}
void UBuildingPlacementComponent::UpdatePreviewMaterial(bool arg_CanPlace)
{
int32 NumMaterials = PreviewStaticMeshComp->GetNumMaterials();
for (int32 i = 0; i < NumMaterials; i++)
{
if (arg_CanPlace)
{
PreviewStaticMeshComp->SetMaterial(i, BuildingSettings->MaterialCanPlace);
}
else
{
PreviewStaticMeshComp->SetMaterial(i, BuildingSettings->MaterialCanNotPlace);
}
}
}
void UBuildingPlacementComponent::ServerUpdatePreviewMesh_Implementation(UStaticMesh* arg_NewMesh)
{
MulticastUpdatePreviewMesh(arg_NewMesh);
}
bool UBuildingPlacementComponent::ServerUpdatePreviewMesh_Validate(UStaticMesh* arg_NewMesh)
{
return true;
}
void UBuildingPlacementComponent::MulticastUpdatePreviewMesh_Implementation(UStaticMesh* arg_NewMesh)
{
if (!LocallyControlled)
{
PreviewStaticMeshComp->SetStaticMesh(arg_NewMesh);
}
}
void UBuildingPlacementComponent::UpdatePreviewMesh(UStaticMesh* arg_NewMesh)
{
if (PreviewStaticMeshComp->IsValidLowLevelFast())
{
PreviewStaticMeshComp->SetStaticMesh(arg_NewMesh);
ServerUpdatePreviewMesh(arg_NewMesh);
if (PlayerCharacter && arg_NewMesh != nullptr)
{
PlayerCharacter->EventOnStartBuildPreview();
}
}
}
bool UBuildingPlacementComponent::InitBuildingUI()
{
if (BuildingSettings->BuildingWidgetClassReference)
{
if (BuildingWidget == nullptr)
{
BuildingWidget = Cast<UBuildingWidget>(CreateWidget(GetWorld(), BuildingSettings->BuildingWidgetClassReference));
BuildingWidget->SetBuildingPlacementComponent(this);
if (PlayerCharacter)
{
APlayerController* PlayerController = Cast<APlayerController>(PlayerCharacter->GetController());
if (PlayerController)
{
BuildingWidget->SetOwningPlayer(PlayerController);
}
}
}
return true;
}
else
{
GEngine->AddOnScreenDebugMessage(-1, 10.0f, FColor::Yellow, FString::Printf(TEXT("Set building widget class reference in the building settings")));
return false;
}
}
void UBuildingPlacementComponent::OnFireAction()
{
if (!bPreviewPlacableSet)
{
return;
}
if (bBuildingModeOn && !bBuildingUION)
{
if (SpawnBuildingNode())
{
ReplicatedSoundComponent->PlaySoundAtLocationReplicated(GetOwner(), BuildingSettings->BuildAudioCue, GetOwner()->GetActorLocation());
}
else
{
ReplicatedSoundComponent->PlaySoundAtLocationReplicated(GetOwner(), BuildingSettings->CanNotBuildAudioCue, GetOwner()->GetActorLocation());
}
}
}
void UBuildingPlacementComponent::TurnOffBuildingMode()
{
NotifyPlaceablesOnBuildModeToggle(false);
TurnOffBuildingModeRPC();
}
void UBuildingPlacementComponent::TurnOffBuildingModeRPC_Implementation()
{
if (PlayerCharacter)
{
PlayerCharacter->EventOnStopBuildPreview();
if (!bBuildingModeOn)
{
return;
}
bBuildingModeOn = false;
PreviewStaticMeshComp->SetHiddenInGame(true);
}
}
void UBuildingPlacementComponent::OnBuildingTypeSelectedChange(EBuildingType arg_NewType)
{
if (!bBuildingModeOn)
{
return;
}
CurrentSelected = arg_NewType;
if (BuildingWidget)
{
BuildingWidget->OnBuildingTypeSelectedChange(arg_NewType);
UpdatePreviewMesh(PreviewPlaceable.Mesh);
PreviewStaticMeshComp->SetHiddenInGame(false);
NewBuildingPreviewNode->SetBuildingSettings(BuildingSettings, CurrentSelected, true);
};
}
bool UBuildingPlacementComponent::SpawnBuildingNode()
{
if (bCanSpawn)
{
// Remove resource cost
PlayerCharacter->InventoryComponent->AddResource(PreviewPlaceable.PlacementCost.ItemType, -PreviewPlaceable.PlacementCost.ItemAmount);
// Spawn
APlayerCharacter* Owner = Cast<APlayerCharacter>(GetOwner());
if (Owner)
{
Owner->SpawnRemoteBuildingNodeServer(PreviewPlaceable, CurrentSelected, NewBuildingPreviewNode->GetActorRotation(), NewBuildingPreviewNode->GetActorLocation(), PreviewStaticMeshComp->GetComponentRotation(), PreviewStaticMeshComp->GetComponentLocation());
return true;
}
}
return false;
}
void UBuildingPlacementComponent::SpawnRemoteBuildingNode(FBuildingMeshData arg_PreviewData, EBuildingType arg_BuildType, FRotator arg_NodeRotation, FVector arg_NodeLocation, FRotator arg_Rotation, FVector arg_Location)
{
if (arg_BuildType == EBuildingType::BUILDING_PLACEABLE)
{
TSubclassOf<APowerCore> PowerCoreClass = arg_PreviewData.Placeable.Get();
if (PowerCoreClass == nullptr)
{
StartBuilding(arg_PreviewData, arg_BuildType, arg_NodeRotation, arg_NodeLocation, arg_Rotation, arg_Location);
}
else
{
PlacePowerCore(arg_Location, arg_Rotation);
}
}
else
{
StartBuilding(arg_PreviewData, arg_BuildType, arg_NodeRotation, arg_NodeLocation, arg_Rotation, arg_Location);
}
}
void UBuildingPlacementComponent::StartBuilding(FBuildingMeshData arg_PreviewData, EBuildingType arg_BuildType, FRotator arg_NodeRotation, FVector arg_NodeLocation, FRotator arg_Rotation, FVector arg_Location)
{
bIsBuilding = true;
EndBuilding(arg_PreviewData, arg_BuildType, arg_NodeRotation, arg_NodeLocation, arg_Rotation, arg_Location);
PlayerCharacter->EventOnBuildingStart();
}
void UBuildingPlacementComponent::EventOnBuildSuccessMulticast_Implementation(FBuildingMeshData arg_PreviewData)
{
Cast<APlayerCharacter>(GetOwner())->EventOnBuildSuccess(arg_PreviewData);
}
void UBuildingPlacementComponent::EndBuilding(FBuildingMeshData arg_PreviewData, EBuildingType arg_BuildType, FRotator arg_NodeRotation, FVector arg_NodeLocation, FRotator arg_Rotation, FVector arg_Location)
{
ABasePlaceable* NewBuildingNode = Cast<ABasePlaceable>(GetWorld()->SpawnActor(arg_PreviewData.Placeable.Get()));
EventOnBuildSuccessMulticast(arg_PreviewData);
if (NewBuildingNode != nullptr)
{
NewBuildingNode->SetActorRotation(arg_NodeRotation);
NewBuildingNode->SetActorLocation(arg_NodeLocation);
UStaticMeshComponent* BuildingNodeStaticMeshComp = Cast<UStaticMeshComponent>(NewBuildingNode->GetComponentByClass(UStaticMeshComponent::StaticClass()));
if (BuildingNodeStaticMeshComp)
{
BuildingNodeStaticMeshComp->SetCollisionProfileName("Placable");
}
}
else
{
GEngine->AddOnScreenDebugMessage(0, 5.0f, FColor::Red, TEXT("Placeable actor is not a child of ABasePlaceable"));
}
bIsBuilding = false;
PlayerCharacter->EventOnBuildingEnd();
}
FBuildingMeshData* UBuildingPlacementComponent::GetBuidlingMeshData(EBuildingType arg_Type)
{
switch (arg_Type)
{
case EBuildingType::BUILDING_PLACEABLE:
if (bPreviewPlacableSet)
{
return &PreviewPlaceable;
}
return nullptr;
break;
default:
return nullptr;
break;
}
}
void UBuildingPlacementComponent::RefreshPreviewMesh()
{
UpdatePreviewMesh(PreviewPlaceable.Mesh);
}